The 100m is a race of power and explosiveness. Learning how to sprint effectively is no easy feat. The greatest sprinters can cover the distance in under 10 seconds.
It is incredibly difficult to achieve the times of the world’s elite athletes. Being naturally quick is not enough to succeed. Dedicated training and specific practice are needed.
But don’t threat, this guide will take you through how to run the 100m and will lead you to achieve better times in the event.
Unlock your sprinting potential with expert tips, training strategies, and performance insights delivered weekly.
Get Faster100m Training
Warm-up
The goal during your warm-up is to facilitate faster muscle contractions and help prepare you for your training. You need to make sure you get lots of blood flowing so that oxygen is transported to the active muscles contracting during movement.
Warm-up routine:
- 5 minutes of cardio – Start your warm-up with 5 minutes of light cardio. Our sprinters usually opt for jogging around the track but cardio machines (treadmill, rowing machine, etc.) are fine too.
- Dynamic stretching and mobility drills – Avoid static stretching when the muscles are cold. Focus on dynamic movements and active stretching. These types of stretches and drills will help you reach your warm-up goal.
- Technique drills – When performed correctly, technique drills can provide a direct transfer to your acceleration and maximum velocity sprinting.
- Accelerations – Perform 3-4 accelerations, driving from the start line for 20/30/40/50m. You should increase the intensity with each acceleration.
Interval Training
The bulk of our sprint training is made up of intervals. The 100m is one of the shortest sprints so you’ll want to make sure the distance of your runs is not too long. To give you an idea, we rarely perform runs over 400m once pre-season has ended.
The intensity and volume of your training can vary. You want the workload of your training to match the intensity of the event. This usually means performing sprints at a high-intensity level (at least 90%) accompanied by full or close to full recovery in between sets.
If our athletes are running at 90% or more, they will have a full or close to full recovery.
But there are other training variables to consider. For example, if the volume of training his high, then the intensity of each individual run will be below 90% with shorter rest periods.
Strength Training
Strength sessions are an important aspect of training used to maximise your sprinting potential.
Strength training doesn’t solely involve lifting weights in the gym.
We usually have 2 strength training sessions a week consisting of 1 explosive strength training session and 1 reactive strength training session.
Race preparation
First, let’s go through what you need to do to prepare for race day. Getting this right could make all the difference at the finish line.
Pre-race Preparation
- Get an appropriate amount of sleep the night before
- Eat a good breakfast before the race (eating lunch/snack may be appropriate depending on the time of your race/races)
- Stay hydrated
Warm-up
I suggest that you begin warm-up 45 minutes – 1 hour before the scheduled start time of your race. There is often a lot of waiting around on event days, so this will make sure that you’re prepared physically and mentally in time.
It also gives you a chance to use the bathroom, make any last-minute preparations and get to the athlete waiting area.
Your actual warm-up should be the same as the warm-up you perform during training, minus the technique drills.
Setting up the starting blocks
When you are setting up your starting blocks you want to make sure your setup is the same every single time. You don’t want to vary or guess your block positions. Consistency is the key.
How to find your pedal positions:
- Use 2 feet lengths from the start line for the front pedal.
- Use 3 feet lengths from the start line for the back pedal.
- Place the angle of the blocks at around 45 degrees.
Note: This is a guideline. Feel free to practice varying block positions in training and stick with what feels best for you.
If you have no clue where to place your feet you can read our starting blocks guide to see how to determine which foot goes in the front pedal.
Test both positions. See what’s most comfortable and what allows for the greatest acceleration out of the blocks.
Pre-Race Routine
Once the blocks are in place, I like my athletes to go through the same routine. They do a couple of accelerations from the blocks (2-3) and increase the distance of each acceleration from around 10-30m.
Each individual athlete has their own routine that helps get them to relax and get in the zone. This can be some sort of pre-race ritual, positive mental imagery, etc.
Don’t worry about this too much when starting out. It will develop over race experience. The important thing is to try and settle the nerves and keep relaxed.
How to run the 100m
We’re able to split the race into 3 different phases. Get these right and you’ll start to lower those numbers on the clock.
On Your Marks
Block starts can be a bit tricky to perform, especially if you’re inexperienced. That’s why practice during training is so important.
To get into the blocks, start out in front on all fours and coil yourself back into them like a spring waiting to pop.
Don’t place your entire foot on the pedals. You want the tip of the forefoot to be in contact with the ground as demonstrated in the picture below.
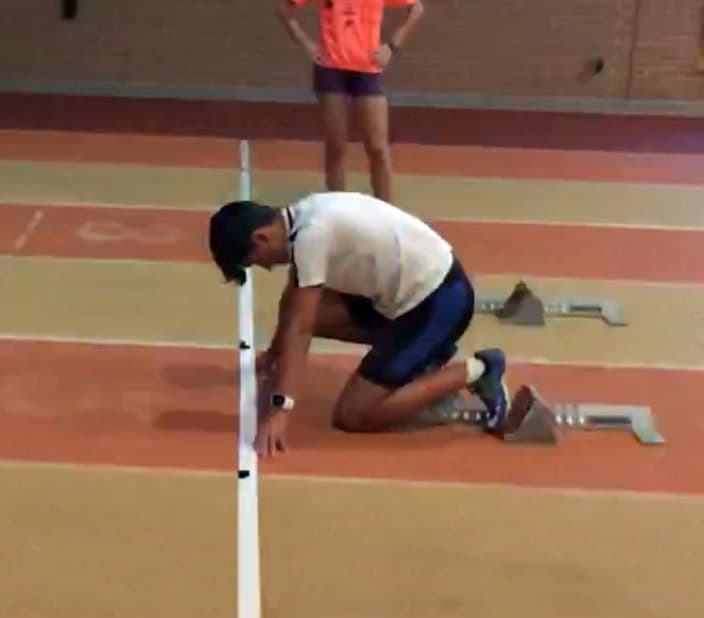
Place your hands just outside of shoulders width and make sure they are behind the line. Your fingers and thumb should form an arch which will allow for stability when you come up into the set position.
When the official says set, raise your hips and extend slightly at the knees. Come up into a position where your hips are higher than your shoulders. Keep a straight line through the hips, spine, and head so that everything remains in a neutral position.
Don’t lean forward so that you are over the line. This will take the weight off your feet and transfers it to your hands. You want the tension in your feet so that you can push hard off the pedals and explode from the blocks.
The Acceleration Phase
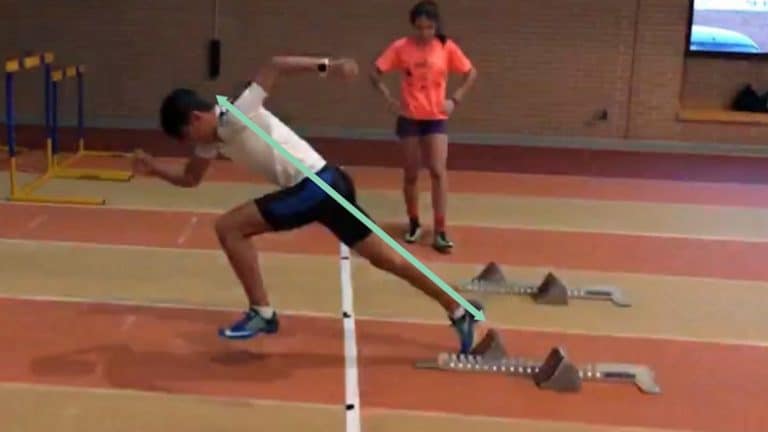
This phase involves blasting out of the blocks by pushing off the rear and front pedals hard with both feet. Here you want to pull your rear leg through quickly whilst the body leans forward.
Extend the leg in the front pedal at the knee and hip upon completion of the movement to bring the body into a 45-degree angle from the ground. You should be able to make a straight line from the foot that was in the front pedal, through the body, and to the head as shown in the image below.
Your COM (center of mass) should be in front of your foot during the first few steps while you drive low. Be aggressive out of the blocks and push your feet explosively into the ground with every stride. At the same time, you will drive your arms back and forwards in opposite directions.
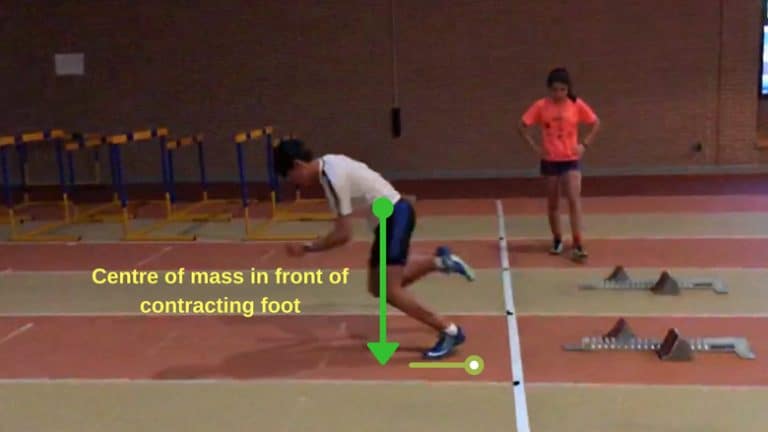
Try not to overstretch during your first stride out from the blocks. This will only cause you to decelerate faster. It also puts unnecessary pressure on the hamstrings which could cause an injury.
Note: This often occurs due to poor positioning in the blocks or the athlete trying to stand upright too quickly.
The Transition Phase
During your acceleration, you will begin to build momentum and increase your velocity. Try and increase the length of your stride with every step.
The next task is to make an efficient transition to an upright horizontal sprinting position over the first 30-50m.
This should be a gradual process that allows you to come up naturally from the force created by your strides. Abstain from standing upright too quickly. This will cause you to lose momentum faster and decelerate.
The Gliding Phase
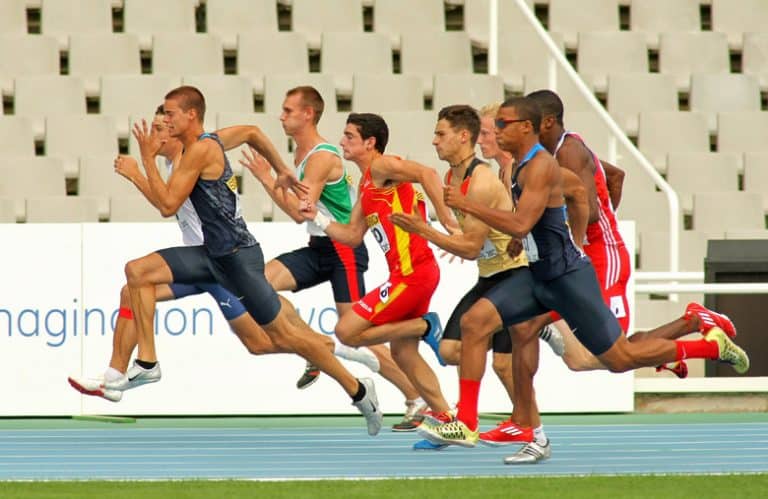
The gliding phase begins once the torso is upright. Here you will use your leg muscle strength and sprinting form to maintain a wide but comfortable stride length.
Try and stay relaxed. This means no hunching of the shoulders or clenching of the jaw. High levels of tension in the body will only slow you down sooner. Once you reach your top speed you will only be able to maintain it for a minimal amount of time. This is why getting the acceleration right can make or break your race
Deceleration is unavoidable but good sprinting technique can help maintain your maximum velocity.
Putting the phases of the 100m together
100 Metre Sprinter Training Templates
Training Examples
100m Sprint Training: Week 1
Day 1: 4 x 6 x 60m back-to-backs with 5 min recovery.
Day 2: Strength training session.
Day 3: 3 x 110m/90m/70m/50m with 7 minutes recovery.
100m Sprint Training: Week 2
Day 1: 3 x 5 80m harness runs with 6 min recovery.
Day 2: Strength training session.
Day 3: 3 x 60m/80m/100m/120m with a walk back with 6/8 min recovery.
100m Sprint Training: Week 3
Day 1: 4 x 40m/ 3 x 60m/ 2 x 80m/ 1 x 100m with 5/7/9 min recovery. First set from blocks.
Day 2: Strength training session.
Day 3: 40m/70m/100m/70m/40m x 2 with 6 min recovery.

